On Friday, September 4th 2020, Spread Your Legs and Fly will be released for Android on the Google Play Store. For just $1.99 US you too can experience the thrill of a stiff breeze up your skirt carrying you to new heights, while you bludgeon your opponents in an attempt to rip their skirts to shreds.
Read moreMultiplayer Update Released
Scottish clans are fiercely independent, priding themselves on their individuality and self sufficiency. For the most part they like to go about their business without the interference of other clans, and in turn, they don't meddle in the affairs of their neighbours. There comes a time however, where clans have to come together to fight a common enemy, and to protect the nation of Scotland. In times of war, Scottish clans invoke an ancient code that joins them together as brothers in arms. This code is known by the ancient Celtic words: “Co-op Multiplayer.”
As Alfredo travels the world on his mission of liberation, it becomes clear to him that he will need to invoke this code. That is why as of today, players of Defend the Highlands: World Tour will be able to join forces with their friends in the newly released Co-op Multiplayer game mode.
Working together will introduce a whole new element of strategy to the game. While two heads may be able to think twice as fast, it will also require coordination and teamwork, so communication is essential. Players share resources, but have exclusive control over their own Scotsmen, so will need to be able to respond to the dynamically changing game environment to support each other when needed.
For an independent Scotsman, this may be a challenge, but it's a challenge that any true Scotsman can rise to. And thus, we now invoke the ancient Scottish code of Co-op Multiplayer. For Scotland!
Store page - http://store.steampowered.com/app/527320/Defend_the_Highlands_World_Tour/
Multiplayer Update Coming Soon
Greetings fellow Scotsmen and Scotswomen. Here's one for you: What could be more fun than guzzling whisky, throwing porridge and blowing up haggis?
It's a tricky one for sure, but the answer of course is guzzling whisky, throwing porridge and blowing up haggis with friends.
Until now, it's been a dream for many a Scot, but soon, that dream will become a reality. We've been hard at work on the co-op multiplayer game mode, and can announce that multiplayer will be available on July 12.
Co-op multiplayer matches will work in much the same manner as a regular skirmish game, so any true Scotsman should feel right at home. The only difference is that there will be Scotsmen of two different clans taking the field together, represented by two different tartan color schemes. Working together, the two clans will share their porridge stockpile and money, but independently control their troops.
Using the chat window, players can discuss and plan strategies that would make William Wallace proud. Perhaps one player will man the frontline while the other manages the economy and the long ranged combat, or perhaps each player will focus on a separate flank. That's up to you to decide.

Matches can be browsed, joined or hosted in the multiplayer lobby, and can be open, or password protected, in case you want to make sure only true Scotsmen can join. Both standard and last stand game modes are supported, so whether you're after a carefully orchestrated defence, or an all out slaughter fest, you'll find what you're looking for.
So if any of you need an excuse to get your friends playing, here it is (as if you'd need an excuse). Incidentally, the game's 15% off until July 6, so don't wait.
Steam Page Up
Hi everyone, sorry it's been a while since I posted an update. Been quite busy the last couple of weeks. I can however now unveil the Steam store page which went up over the weekend. Check it out - http://store.steampowered.com/app/527320/
Release is now set for Saturday, May 13th, so best start stockpiling porridge now.
Yellowstone
The Scotsmen continue their romp through America's national parks when they travel to Yellowstone. The local porridge factory has been polluting the waterways, drawing the ire of the Americans. A bloody stand-off is bound to take place here, and Alfredo is determined to have his army of Scotsmen in the thick of it.

The haggis factory is on the upstream side of the map, at the top of a small waterfall. The cliffs make for an excellent defensive position for the player to start from. However, only two of the six oat fields are nearby, so the player will need to move their front-line troops down into the valley to harvest more oats. The enemy approaches from two sides of the map, split in half by a river, so fighting on two fronts will be required.

Trailer
Trailer's out. Steam page should be set to "coming soon" later this week. It's getting close!
Some Americans
Another big milestone in the development of Defend the Highlands World Tour was passed this week, in that we finished recording the voices for the rest of the characters (up until now we'd only recorded the Scottish voices). I had a blast listening to them as I edited, especially the Monty Python-esque French insults and the Australian accents. Anywho, here's some more characters, the American hillbillies and football players.

If there's one group of people in America that don't want foreigners in their country, it's hillbillies. Armed with shotguns, they can easily take down Scotsmen who aren't properly protected. Their range is slightly shorter than the throwing distance of a Scotsman however, so they are best countered by Scotsmen throwing porridge from behind cover.
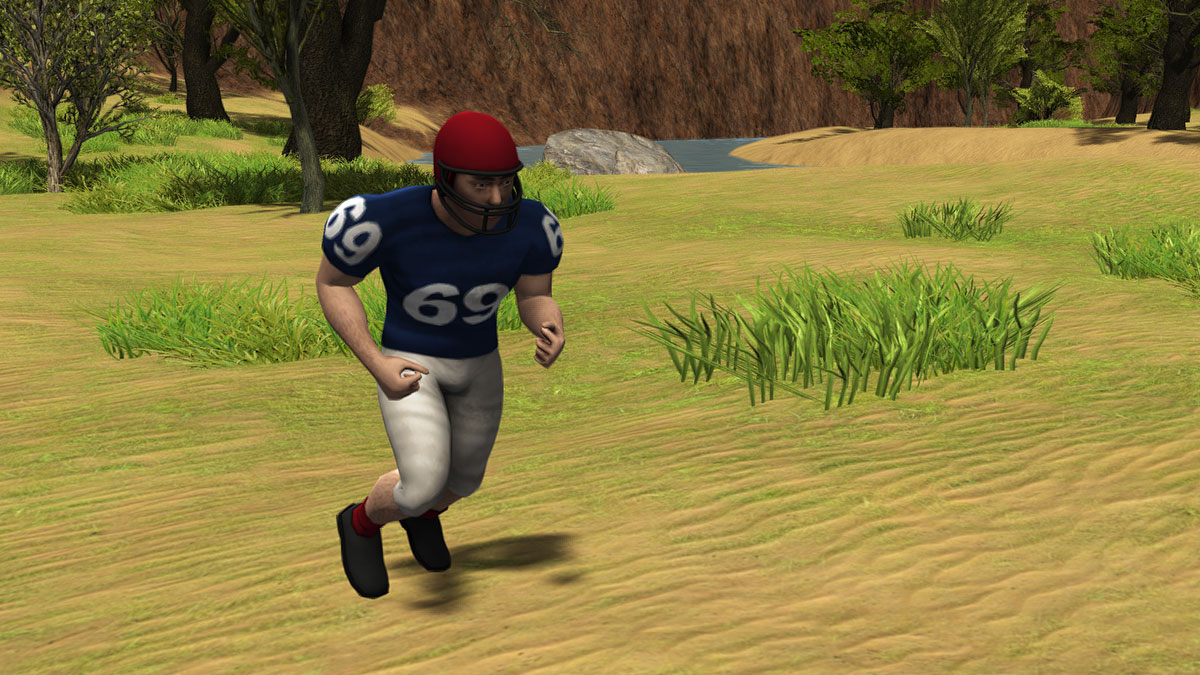
While claims of their being able to throw footballs over mountains may have been exaggerated, they can still throw a football a good distance, and accurately too. Unlike most ranged enemies, they only perform one ranged attack as they approach, and then close in to beat up their targets. The player will need to combine a protective frontline of barricades to block their ranged attack, with a second line of close ranged attackers such as fondue hoses or whisky bars in order to efficiently counter them.
Grand Canyon
Howdy partner – as the Americans would say, for today the Scotsmen finally reach the USA in their quest to liberate their countrymen from foreign oppression.

The Scotsmen make their first stop at a small family owned Haggis Factory in the grand canyon, whose owners are about to be deported. The bagpipe airship arrives minutes before the police can seize the factory owners, and Alfredo and his band parachute down to save the day. The Americans won't go down without a fight however, as they send in their most ignorant hillbillies and toughest football players (who really could throw a football over them mountains). More on these in next weeks post.

The map is essentially split into four tracks by ridges on the left and right, and the river running down the middle (although enemies can cross between the middle two tracks at the shallow water). Stationing Scotsmen on the two outer ridges will allow the player to pick off enemies approaching from below while being out of reach of melee attacks. However, to get the benefit of all of the oat fields, they will also need to send some Scotsmen into the centre as well.
I'm hoping to have a trailer ready in a couple of weeks, so keep an eye out for that.
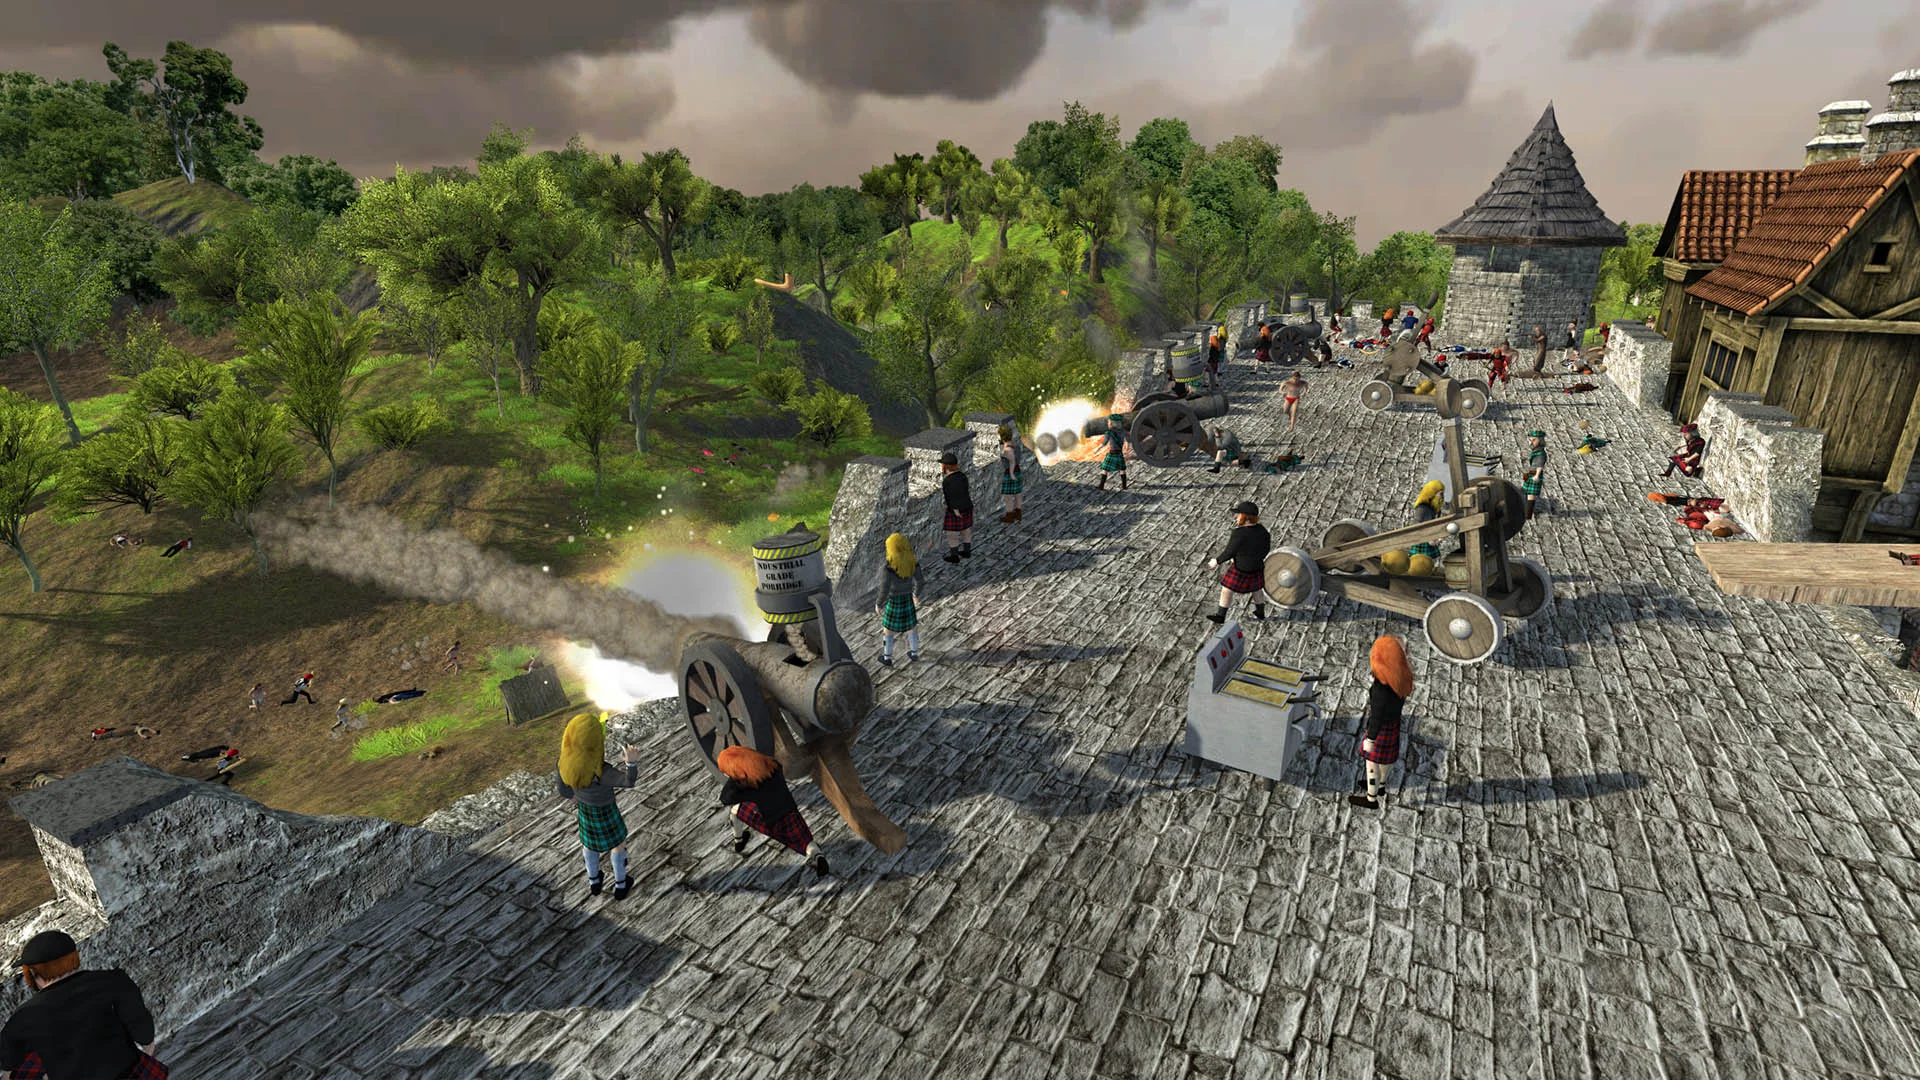
Hell Epic Screenshots
So this week's been spent mostly preparing screenshots for the store page (I'm always surprised at how long it takes to orchestrate and composite good screenshots). Here's three of the ones I've done so far.


Oda Nobunaga
One last post from Alfredo's exploits in Japan, before we move on the Scotsmen’s' final destination, the United States of America. Before he can leave, Alfredo must confront one of Japan's most brutal historical figures, Oda Nobunaga.

Oda Nobunaga is the only boss who lacks a ranged attack, but he makes up for it with his melee combat abilities. He is as fast as the Samurai, the fastest enemy in the game, giving him the ability to easily close in on the players' defences. Unlike the samurai however, he also has very high health, enabling him to bulldoze his way through large swaths of the player's defences before he can be stopped. The best counter is a fondue hose or drop bear nest, which can quickly kill the toughest of enemies at close range.
Fukushima and Shrines
Phew, I managed to survive two weeks with almost no internet, and am now set up in the new house. So without further ado, on to the belated next dev-log post.
The Scotsmen are almost ready to leave Japan when they receive a distress call from the haggis factory in tsunami-ravaged Fukushima. Of all the buildings in Fukushima, the local haggis factory was the only one to survive the tsunami. Now, the survivors have banded together to bring it down, jealous that the Scottish building should stand while their homes were destroyed.

The haggis factory stands on a hill overlooking the flooded town. All enemies arrive by boat and have to make their way through the shallow water, where they will be vulnerable to attacks from the hill. However, the player will need to send men down into the town to capture and defend the oat fields that grow on sand patches scattered throughout the town.

The shrine, which becomes available for the player to unlock after completing the first Japanese level, is a healing tower. Any unit standing within its healing radius will have their health slowly recovered over time, making it useful for keeping hero characters alive, particularly in long matches. It is quite expensive however, so the player will want to make sure they have an area well under control before placing it so it doesn't end up getting destroyed.
Mt Fuji and That
Mt Fuji is an active volcano, and a location of important cultural significance to the Japanese people. It is also the location of Japan's third haggis factory, which is in dire need of protection.

Alfredo and his band of Scotsmen arrive just in time to find the mountain under assault by two new enemies, the Samurai, and the Geisha, who are intent on restoring their natural monument to its natural, haggis free state. They must be stopped.

The samurai is one of the most deadly enemies in the game, possessing both high speed and attack strength. They can easily close in on poorly defended areas and wreak havoc before they can be stopped, despite their mediocre health. Fortunately, they cost the enemy a lot of recruitment points to send in, so you shouldn't see them too often.

The geisha is slow and graceful in her movements, but makes up for it with her scalding cups of tea, which cause splash damage. She is particularly good at taking out whisky bars, since the splash damage negates the cover of the bar, and she doesn't have to get close enough to take damage. Unlike the teapot throwing Englishman in the previous game, she doesn't lift bro, so she can't throw very far, having a range a little shorter than a Scotsman, so she can be dealt with using the default porridge throwing attack. Her slow speed also makes her very vulnerable to haggis catapults and golf tees.
Buddha
As the Scotsmen head further into Japan, they come across a secluded temple hidden in the mountains. The temple hadn't been used for decades, so some Scottish tourists had set up a haggis factory there. Unfortunately, the Japanese people unreasonably decided they wanted to tear it down. Luckily, Alfredo arrives just in time to defend it.

The player starts in a good defensive position atop a cliff, although they will have to venture down into the lower part of the temple complex to harvest more oats. Enemies spawn in the low lying forest surrounding the temple, and will have to attack uphill. The pathway up to the starting position provides a good opportunity for a staged withdrawal if needed.

Here the Scotsmen also encounter Buddha (Yes, I know buddha wasn't Japanese, but he was visiting a Buddhist temple or something). Seeing the persecution of the Scottish people, Buddha agrees to help Alfredo on his mission. However, as a pacifist he cannot attack, but will gradually heal any units within a short distance from himself, making him very useful on long battles if he can be kept protected.
Also this week I've made all of the Steam Achievements and the corresponding icons. Here's an amusing sample.

Main Menu
Hello. So, I missed my post last week, for which I apologise (If you're thinking of moving house, don't, its too much work). So to make it up to you, here's a lovely picture of the main menu which I've spent the last couple of days on.

I have to say, it was quite fun composing the background image :P Critiques welcome of course.
Also, Derek from ScottishGeeks youtube channel has finished recording the Scottish voices for the game, and they're awesome.
Rice Farmers and Sumo Wrestlers
Japan has always been a warrior culture, so as the Bagpipe Airship descends, signalling the start of the Scottish invasion, defenders are already preparing for war. The first of these defenders that the Scotsmen encounter are the Rice Farmer and the Sumo Wrestler.
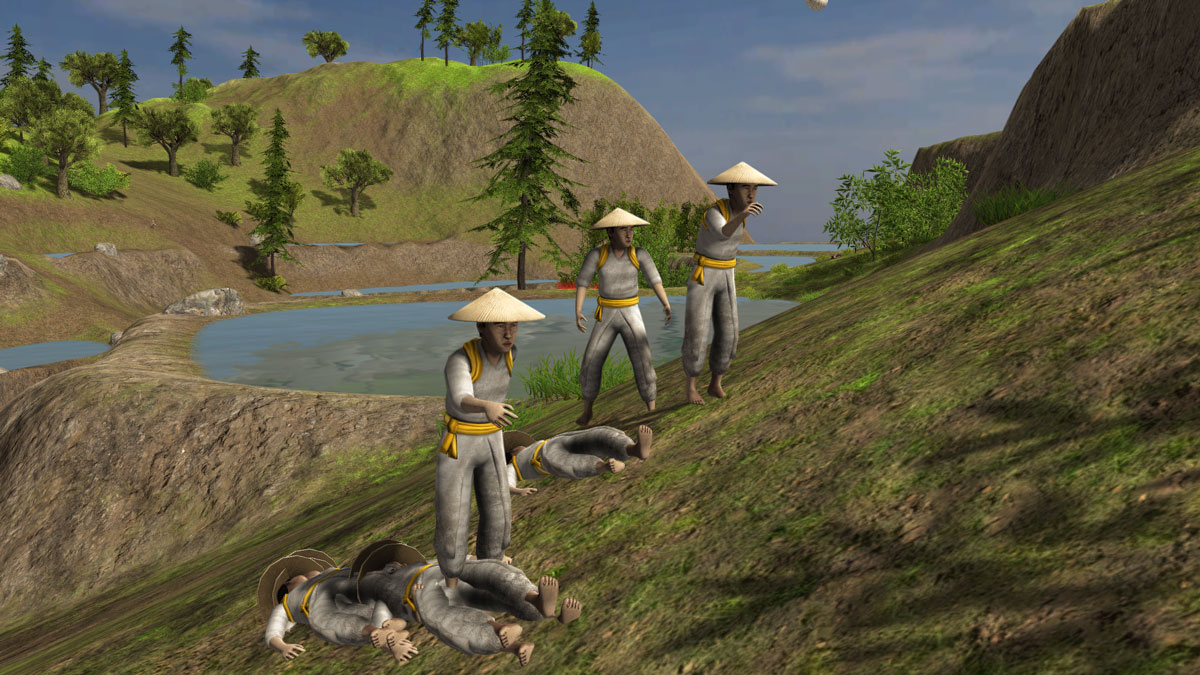
The rice farmer is the most common Japanese enemy, specialising in ranged combat. Their fighting style is similar to that of Scotsmen, only instead of throwing bowls of porridge, they throw balls of rice. This along with their decent speed makes them a good all-rounder, able to take on many different types of towers. They can be especially difficult if allowed to use cover. The best way to defeat them is to hold them at bay with barricades, which provide excellent protection from their attacks, while hitting them with longer ranged towers.

Sumo wrestlers are the polar opposite of rice farmers, being incredibly slow and difficult to kill, and lacking any ranged combat abilities. Unlike other melee enemies, they don't have to attack to cause damage, they simply squash any Scotsman or tower that they touch. This makes them one-hit-killers, especially devastating if they reach any of your hero characters or expensive towers. This also means that they can only be attacked using ranged weapons. Fortunately their slowness makes it easy to kill them before they reach you, as long as you have sufficient fire-power. Their main strength is that they take a lot of hits to kill, so they can draw a lot of fire away from other enemies who can use this opportunity to attack more easily.
The Scotsmen Arrive in Japan
Having conquered Australia, the Scotsmen travel North, to Japan. It is a harsh land for a Scotsman, where haggis ingredients are scarce. However, Scotsmen are resilient, and have managed to establish four haggis factories here.

The first of these factories is at the top of a field of terraced rice paddies, where the operators have been attempting to replace the rice crop with oats. This has of course angered the locals, meaning the factory workers will need the help of Alfredo to defend the fruits of their labour.

Fortunately, the haggis factory is on high ground, with only two narrow roads leading up from the lower terraces, providing a strong, natural defensive position to start with, and if necessary, to fall back on. What's more, in order to reach the player, the Japanese aggressors will need to cross the shallow river at the bottom of the valley, where they will be at a large elevation disadvantage. The terraces provide excellent positions to place towers where they will be protected from melee enemies by the cliffs. However, the terraces on the opposite side of the river also give ranged enemies good vantage points to attack Scotsmen at the bottom of the valley. The oat fields are spread down the slope, so the more oats the player wants, the further they will have to descend into the valley, making themselves easier targets.
Drop Bears
G'day mates. As everyone knows, Australia is full of poisonous snakes, giant spiders, and all manner of critters that want to kill you. None of them however, are as feared as the dreaded drop bear.

Drop bears live in the Australian bush, and ambush their prey by leaping from trees onto unsuspecting animals and tourists who walk underneath, and savaging them with their razor sharp claws and fangs.

Normally drop bears don't attack Australians, due to the scent of Vegemite, which deters them. With a little Scottish ingenuity however, these fearsome creatures can be retrained to be deterred by the smell of haggis instead, making them a great addition to the Scottish arsenal.
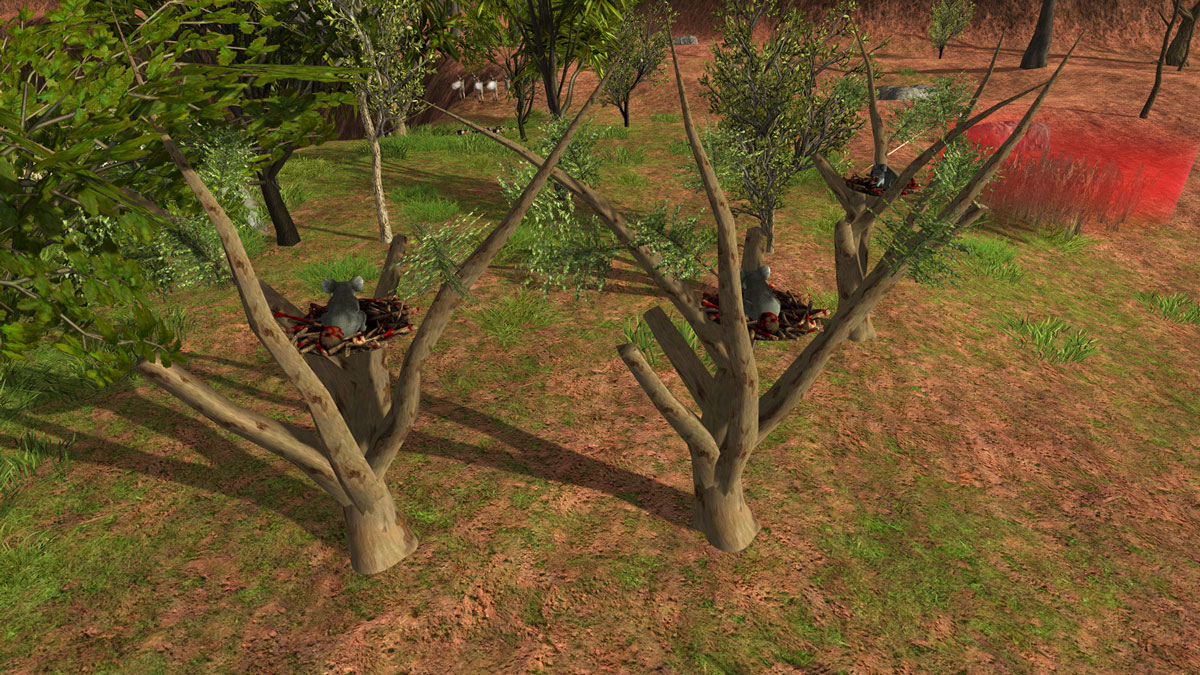
Each drop bear nest the player builds contains one drop bear, which will automatically leap onto enemies who walk within its attack radius. It kills any enemy instantly, making it perfect for taking out strong, expensive enemies. However, its slow attack rate means it is poor at fighting off multiple enemies attacking the nest at the same time, so can easily fall to groups of cheap, weak enemies. Its attack rate can be upgraded to help counter this, but it still should not be placed in areas where it can easily be swamped.
Unlike other towers, Drop Bear nests don't require a Scotsman to operate them, making them a perfect way to beef up your defences without needing to increase your population. This also means that you don't have to worry about the operator being killed by ranged attacks.
Aussie Outback
What ho? I must apologise for missing last weeks blog post, as I was busy preparing to move house soon. But I'm back now, with the final Australian map, the Outback, where a group of haggis factory workers have been stranded for weeks while hostile Australians surrounded them. But here comes Alfredo and his companions to the rescue.

This map is characterised by the central gorge, surrounded by arid desert. The player starts between two waterfalls that lead into the gorge, with two oat fields immediately available. On the far side of each waterfall is another oat field, which is more in the open. The final two oat fields are at the bottom of the gorge. Any Scotsmen down there will be sitting ducks to enemies on the cliff tops, so the player will need to secure the high ground on either side before they can safely take these two oat fields. Enemies spawn from the North of the map, on either side of the gorge, and from the bottom of the gorge.

Oh, and also, I've updated my social media assets with new World Tour artwork. Check out the new headers on facebook.com/defendthehighlands and twitter.com/KiltedCamel
Pharaoh Khufu
Guid mornin lads and lasses. We're quickly heading back to Egypt today, because I forgot to talk about the Egyptian boss, Pharaoh Khufu. And when I say forgot, I mean I hadn't finished him yet. But here he is, in all his Egyptiany glory.

Khufu is often regarded as the most evil of Egyptian Pharaohs, and was responsible for overseeing the construction of the Great Pyramid of Giza. As everyone knows, Pharaohs carried magical sceptres to wield the power of the gods, and Khufu is no exception. His staff allows him to incinerate Scotsmen with balls of fire that explode on impact. The splash damage makes him particularly deadly against groups of Scotsmen, and allows him to damage Scotsmen behind thin cover. This deadly attack does however come at the expense of a longer reload time than most bosses. This along with his lower health makes him more susceptible to attack by charging at him with Scotsmen, a tactic that with most other bosses would result in a lot of dead Scotsmen.
Ned Kelly
Whatto folks. It's been quite a busy week with non-game related stuff, so just a quick one today, showcasing the Australian boss. So without further ado, Australia's most well known outlaw, Ned Kelly.

With his makeshift steel armour, he is the hardest to kill of all the boss characters, boasting a health stat double that of Napoleon (the boss with the next highest health). Along with his long range and accuracy, this makes him essentially a beefed up version of the Outback Aussie. The player will need a strong defensive line of Scotsmen behind oat bag barricades to hold him in position long enough to whittle his health down using long ranged towers (preferably haggis catapults, as golf clubs will take a long time to kill him with their lower damage). Or perhaps they could take advantage of the limitation of his attack requiring line of sight to draw him into an ambush using the secret Australian tower… More on that another time.